ServeSpark is your ultimate companion when it comes to efficient scheduling and managing your services. With the power of custom recurring availabilities, you can take your scheduling to the next level. In this article, we will walk you through the process of creating custom recurring availabilities on ServeSpark, step by step. So, grab your keyboard and let’s get started!
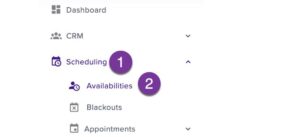
Step 1: Access the left menu. From there, navigate to the “Schedule” section and click on “Availabilities.
Step 2: Click on “New Availability” button from the top right corner of the screen.
![]()
Step 3: Naming Your Availability Now, it’s time to give your availability a friendly name to help you easily identify it later.
![]()
Step 4: Ensure that your availability is, check the box labeled “Active.”
![]()
Step 5: Select “Recurring service” from the available options.

Step 6: Setting a Recurring Period Now, let’s configure the recurring period for your availability:
Click on the “Recurring period” option.

Step 7: Configuring Recurring Details In this step, you’ll specify the details of your recurring availability:
Highlight the section where you can set the start and end date, start and end time, and recurrence interval.
Check the box labeled “Set a recurring period for this availability?”
Enter the start and end date for your availability.
Specify the start and end time for each occurrence.
Enter the number of times your availability recurs in the “Recurs every” field.
Select the appropriate unit for recurrence from the options such as “Days,” “Weeks,” or “Months.”

Step 8: After filling in all the necessary information, click “Save.”
![]()
You’ve successfully created a custom recurring availability on ServeSpark. This powerful feature ensures your scheduling is streamlined and efficient. Now, you can easily manage your services with confidence. ServeSpark empowers you to take control of your schedule, helping you optimize your time and resources.