In today’s digital age, branding is vital for standing out and making an impression. With ServeSpark, you can easily add your custom logo to your platform, enhancing its uniqueness and professionalism. This article guides you through the straightforward steps to showcase your logo prominently.
Step 1: Access Your Profile
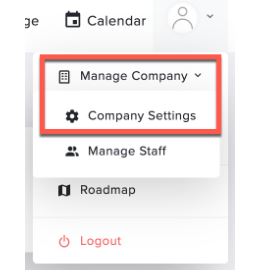
Navigate to the top right corner of your screen. There, you’ll find a small profile icon – typically a user avatar or your profile picture. Click on this icon to open a drop-down menu.

Step 2: Navigate to “Manage Company”
In the drop-down menu, you’ll see several options related to your account settings. Locate and click on “Manage Company.” Clicking on it will take you to the next step
Step 3: Access Your Company Profile
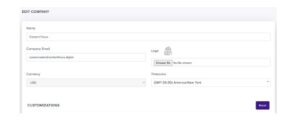
Once you’ve clicked on “Company Settings,” you’ll be directed to your company’s settings page. Here, you can configure various aspects of your company’s profile and branding. To add your custom logo, look for the section labeled “Edit Company.” This is where you can customize your company’s visual identity.
Step 4: Upload Your Custom Logo
Within the “Company Profile” section, you’ll find a dedicated area for uploading your logo. It’s labeled as “Logo”. To upload your custom logo, click on the “Choose File” button. This action will open a file explorer window on your computer.

Step 5: Select and Upload Your Logo
In the file explorer window, navigate to the location on your computer where you have your custom logo saved. Once you’ve found it, select the logo file and click the “Open” button. This will initiate the uploading process.

Step 6: Save Your Changes
After you’ve successfully uploaded your custom logo, it should appear in the designated area within your company profile settings.
