Ready to share your expertise with the world through online courses? Whether you’re an expert or a passionate educator, ServeSpark is here to guide you. This article will walk you through the steps of creating your course, helping you become a successful online instructor in no time.
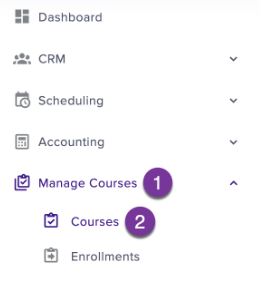
Step 1: Access the Course Management Page
Navigate to the “Manage Courses” section. You can typically find this option in the main menu on the dashboard.
Then click Courses.
Step 2: Create a New Course
From the top right corner of the “Courses” page, click on the “New Course” button.

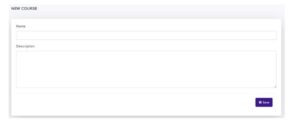
Step 3: Provide Course Information
In the course creation form, enter the following details:
Course Name: Give your course a descriptive and engaging title.
Description: Write a compelling description that outlines what your course offers and why it’s valuable.
Once you’ve entered the course name and description, click the “Save” button to create your course.
Step 4: Add a Lesson
After successfully creating your course, you can begin adding lessons. Click on the “New Lesson” button, located at the bottom right of the course dashboard.

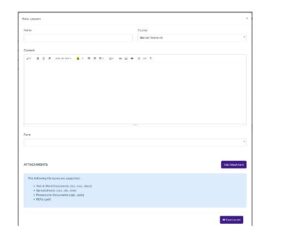
Step 5: Complete Lesson Details
A form will appear, allowing you to input the lesson details:
Name: Provide a clear and informative name for your lesson.
Select Course: Choose the course to which this lesson belongs.
Content: Any other instructional material.
Select Form: Choose a form associated with this lesson.
To add attachments (such as PDFs, supplementary materials, or resources), click the “Add Attachment” button and upload the files.
Once you’ve filled in all the necessary information and attached any files, click the “Save Lesson” button to save your lesson.
Congrats! You’ve created a course and added your first lesson. Remember, course creation is ongoing; add more lessons and refine content as needed. Tailor your course to your audience for an engaging learning experience. Now, share your knowledge with the world through your ServeSpark-powered online course.