In the realm of business, professionalism is key, especially in creating and sending quotes. This guide within ServeSpark outlines steps to craft and send professional quotes, showcasing your competence and building trust with potential clients.
Step 1: Access the Quote Section
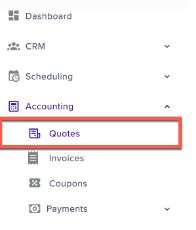
Navigate to the Quotes Section: Located at the “Accounting” menu. Click on “Quotes” to access this section.
Step 2: Creating a New Quote
Once you’re inside the “Quotes” section, follow these steps to initiate a new quote:
Click “New Quote” from the Top Right Corner.

Step 3: Completing the Quote Form
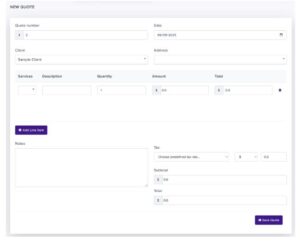
After clicking “New Quote,” a form will appear, prompting you to fill in various fields. Here’s a breakdown of the essential information you need to include:
Quote Number: Assign a unique identification number to your quote. This helps with tracking and referencing quotes efficiently.
Date: Specify the date when the quote is issued. This is critical for both you and your client’s records.
Client: Enter the name of the client to whom the quote is addressed. Verify that this information is accurate.
Address: Input the client’s mailing address or location.
Service Type: Indicate whether the service is a “One-time” or “Recurring” service. This distinction is crucial for understanding the nature of the work.
Description: Provide a detailed description of the service you are quoting for. Be explicit about what the service entails, any additional options, and the terms and conditions.
Quantity: Specify the quantity of the service or items being quoted, if applicable.
Amount: Mention the pricing for the service.
You can add multiple line items by clicking “Add Line Item.”
Notes: Include any additional notes or comments related to the quote. This could encompass special instructions, delivery details, or clarifications.
Tax Rate: Choose a predefined tax rate, either in currency or percentage, depending on your local tax regulations.
Upon filling in these details, the “Subtotal” and “Total” fields will automatically calculate.
Step 4: Review and Save the Quote
Before finalizing the quote, review all the information to ensure its accuracy. Verify that the pricing, dates, and client information are correct. Once satisfied, proceed with next steps:
Save the Quote: Locate the “Save Quote” button at the bottom of the form. Click it to save the quote.